1st December 2016
Throwback to the pic I took just after summer was over earlier this year. I've missed beach weather and now it's officially summertime here again in Australia, and the beginning of DIY December.
I don't always fully plan out a craft project when I start. I have inspiration or ideas to start me off and then go from there. Maybe that's not the best way to do it, but it's the most creative for me. However I do tend to create the project around something, such as a theme or stand-out embellishments that may be a one off card or turn into a set.
Today I am making three of my own embellishments using various craft products I have. This way you can create some unique items that you might not have found in-store or perhaps you have but it is cheaper to make it yourself. It's very easy, cost effective, and takes hardly any time at all.
5 Minute DIY Mini Christmas Wreaths
There's really only one thing needed for this project (aside from scissors) and that is a packet of metallic red and green pipecleaners, also called Chenille sticks. You could use non-metallic if that is all you can find but I think that these really stand out.
One 30cm green pipecleaner is enough to make 4 mini wreaths, and one red 30cm pipecleaner can go towards making 8 mini wreaths. You should be able to find pipecleaners at any craft store or craft section in a discount or department store. I believe I got mine in the Christmas section. The packet came in green, red and silver.
- Cut the 30cm green pipecleaner into four 7.5cm pieces, and the red into four 3cm pieces.
- Fold the strip of pipecleaner around itself leaving a bit left at the top, enough to fold down on itself.
- Fold both pieces down hidden into the rest of the wreath. For "fuller" looking wreath you can cut slightly longer pieces and leave more at the top to fold around, creating a "double layer"
- Put one of the 3cm red pieces through the wreath, folding to create the v shape shown.
- Twist these red pieces together once to secure and you'll have yourself a red bow!
Christmas Tree Cut-Outs
With Tinsel Decoration
For this you'll need some Christmas themed card-stock or paper, or even just plain coloured card-stock in Christmas colours. You'll also need some tinsel-type ribbon in whatever colour you like. I found mine at The Reject Shop, $2.50 for 3m. For the tools you'll need: double sided tape and double sided foam, scissors, a ruler, sticky tape, and a pencil or pen.
My paper tree size is going to have a base size of approximately 7cm and a height of 8cm. It is up to you if you use a plain triangle to represent the tree or create the more common tiered shape. For simplicity sake I am just going to make triangles.
- Mark 3.5cm and 7cm lengths on the paper.
- Mark a spot 8cm up from the 3.5cm mark, which is the centre part of the tree and where you will draw your lines to so it is a precise isosceles triangle.
- Connect the marks to create the triangle shape.
- Draw out as many triangles as you wish with the patterns of your choice and carefully cut them out.
- Cut 3 different lengths of tinsel ribbon. I found this more precise than just wrapping a large piece of the tinsel around the paper. I used 5, 7, and 9cm lengths.
- Prepare the paper trees by using double sided tape to create the precise angles the tinsel ribbon will adhere to, folding it to the back as necessary.
- Press the lengths of tinsel ribbon onto the double sided tape to adhere.
- Use regular sticky tape to stick down any loose bits of tinsel on the back side of the tree.
- Cut squares of different colour paper or cardstock to create contrasting bases for the trees.
- Place double sided foam (don't rip of the uppermost sticker yet) on the back side of the trees and bases. Now you can use these for cards or scrapbooking in the future.
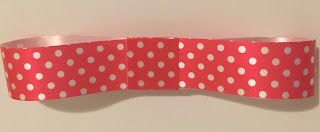
5 Minute Simple Pop-Up Bow for 3D effect
- Fold the ribbon loosely to determine what size you'll need to cut it. I did quite a large bow meant for the front of a greeting card, approximately 22cm.
- Put strips of double sided tape on both of the ends of the ribbon and fold in half to see where the middle is.
- Fold the ribbon back in on itself and stick in the middle.
- I also cut a small piece of the same ribbon to go around the middle of the whole bow.
- Put strips of double sided tape on the back of this small strip.
- Place the small strip of ribbon onto the middle of the ribbon, trimming enough off of it so it won't overlap around the front.
- Once done, stick some double sided foam onto the back sowhen you're ready to use it, it adds that extra dimensional layer.
These may be simple looking embellishments but can add some pizzazz to your creations. Do you make your own embellishments? Comment below.


No comments:
Post a Comment