2nd December 2016
Christmas Gift Tags
I'm sure most of the time we just pick up a pack of gift tags or stickers from the store for our presents but a nice way to give your gift a personal touch is to add a gift tag that you've designed yourself.
Plain tags can be bought from a craft store or craft section of a store. I got mine from Riot Art and Craft. These measure approximately 8.5 x 5cm.
Gift Tag Type 1

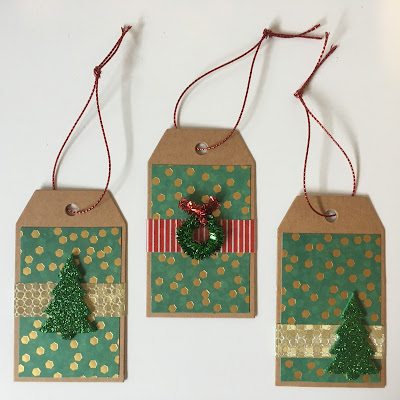
The first set of tags I made are just simple paper, tape, and embellishments. I used 3D foam Christmas Trees, and the Christmas wreaths I made yesterday (blog post here http://seacityhandcraftedarts.blogspot.com.au/2016/12/diy-december-day-1-of-christmas-craft.html)

- Cut out rectangles of your chosen paper and place double sided tape on the back of them.
- Stick these to your blank tags.
- A tip to make your embellishments pop is by putting patterned tape under them.
Gift Tag Type 2
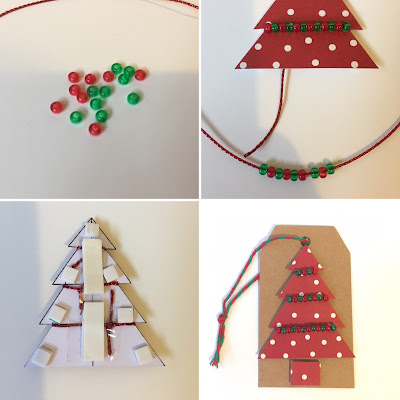
- For the next gift tag type measure out your tree on the back of your chosen paper. I measured 5cm width, and 6cm height.
- Make 2cm marks along the 6cm line you've drawn.
- Draw lines horizontally where you've made the 2cm marks. My first line is 2cm, next is 3cm, and the final is 4cm.
- Make marks 0.5cm in from both ends of the lines you've just drawn, which will be the start of the next angle in the tree. Connect the lines as shown in the bottom left picture above.
- Carefully cut out your tree, and a little square to be the base of the tree.
- On the back of the tree add little foam squares so it will create a 3D effect when placed on the tag.
- I used little red and green beads on red string for the decorations on the front.
- I did each layer separately: stringing the beads on, and tying the strings at the back.
- Add larger bits of double sided foam to create more padding for the tree.


No comments:
Post a Comment